Tuesday, March 12, 2024

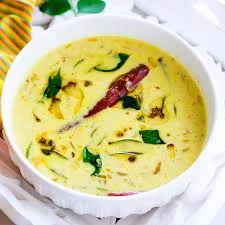
Ramadan Recipe -Special Traditional Iftar Delight-Famous Thari Kanji

As Ramadan begins, many turn to traditional recipes for Iftar. Thari Kanji, a sweet and energy-boosting drink, is a staple in many households.
Made with semolina, this delightful beverage is flavored with:

  • Sweetness: A touch of sugar for a delightful taste.
  • Savory hint: A pinch of salt adds depth to the flavor profile.
  • Jewel-like additions: Cashews, raisins, and caramelized onions add a textural and visual treat.

Here's how to prepare this heartwarming drink:

  1. Gently heat the thin coconut milk: In a medium pan, bring it to a simmer.
  2. Semolina time: Slowly add the semolina while constantly stirring to prevent lumps and sticking.
  3. Sweetness and a hint of savory: Add sugar and a pinch of salt to the simmering mixture. Continue stirring until the semolina cooks well.
  4. Richness boosts: Pour in the thick coconut milk and heat it gently, avoiding a full boil.
  5. Desired consistency: Aim for a slightly thick, drinkable texture.
  6. Cardamom magic: A sprinkle of cardamom powder adds a touch of warmth and aroma.
  7. Caramelized delight: In a separate pan, heat ghee and saute the sliced onions until lightly browned.
  8. Nutty and sweet additions: Fry the cashews until golden brown, then add the raisins and let them puff up.
  9. Bringing it together: Pour the caramelized onions, cashews, and raisins over the prepared Thari Kanji and stir well.

Enjoy this warm and inviting Thari Kanji as you break your fast and celebrate Ramadan!

Additional notes:

  • Feel free to adjust the sweetness according to your preference.
  • For a richer flavor, consider using full-fat coconut milk.
  • Experiment with other dried fruits like chopped dates or figs for a delightful variation. 

Tuesday, January 30, 2024

Divine Delights: Dive into the History and Recipe of Grandma's Traditional Sweet Kerala Kozhukkatta

 Kozhukkatta, also known as modak or sweet dumplings, is a popular South Indian delicacy enjoyed during festivals like Ganesh Chaturthi and Onam. These delightful treats boast a soft rice flour dough encasing a sweet and creamy coconut filling, steamed to perfection.

 A Bite of History:
The origins of kozhukkatta can be traced back centuries, possibly to the ancient Tamil kingdoms. They are believed to be offerings to various deities, particularly Lord Ganesha, who is said to have a fondness for sweets. Over time, kozhukkatta evolved into a cherished culinary tradition, passed down through generations and prepared with love during festive occasions. 

Variations and Flavors: 

While the basic concept remains the same, kozhukkatta comes in a variety of regional variations, each boasting its unique twist. Here's a glimpse into two popular styles: 

Thrissur Kozhukkatta: Known for its melt-in-your-mouth filling, featuring roasted coconut for a richer flavor and less jaggery for a subtler sweetness. The dough is thicker and more elastic, resulting in larger, disc-shaped dumplings often left plain or adorned with a simple cashew nut.

Calicut Kozhukkatta: This version features a sweeter and more syrupy filling with a generous amount of jaggery. The dough is thinner and delicate, giving the dumplings a lighter and fluffier texture. They are typically smaller and rounder, often decorated with intricate designs using edible pastes or chopped nuts and fruits.

Bringing the Sweetness Home: 

Ready to whip up a batch of your own kozhukkatta? Here's a basic recipe to get you started: 

Here's a recipe for steamed kozhukkatta, the delightful South Indian dumplings filled with sweet coconut goodness: 

Ingredients: 

For the filling:

1 cup grated fresh coconut

1/2 cup jaggery, grated or powdered

1/4 teaspoon cardamom powder

1/8 teaspoon grated nutmeg (optional)

For the dough:

1 cup rice flour

1/4 cup water

1/4 teaspoon salt

1 tablespoon ghee or oil

Instructions:

Make the filling: In a pan, combine the grated coconut, jaggery, cardamom powder, and nutmeg (if using). Cook over medium heat, stirring constantly, until the jaggery melts and the mixture thickens. Turn off the heat and let it cool slightly. 

Prepare the dough: In another pan, bring the water and salt to a boil. Add the rice flour gradually, stirring continuously, until it forms a soft dough. Add the ghee or oil and knead well until smooth. Cover the dough and let it rest for 10 minutes.

Assemble the kozhukkatta: Divide the dough and filling into equal portions. Take a portion of the dough and flatten it into a small disc. Place a spoonful of filling in the center and pinch the edges closed to form a round ball. Repeat with the remaining dough and filling. 

Steam the kozhukkatta: Place the kozhukkatta in a steamer basket lined with banana leaves or greased with oil. Steam for 10-15 minutes, or until cooked through. 

Serve: Let the kozhukkatta cool slightly before serving. You can enjoy them warm or at room temperature.

Tips:

  • For a richer flavor, you can roast the grated coconut before making the filling.
  • If the dough is too sticky, add a little more rice flour. If it's too dry, add a little more water.
  • You can also experiment with different fillings, such as dates, nuts, or pumpkin seeds.
  • Kozhukkatta can be stored in an airtight container in the refrigerator for up to 3 days.

Additional notes: 

This recipe makes approximately 15-20 kozhukkatta, depending on the size you make them.

You can use either white or brown rice flour for this recipe.

If you don't have a steamer, you can use a colander or sieve placed over a pot of boiling water. Just make sure to cover the pot with a lid to trap the steam. I hope this recipe helps you enjoy delicious steamed kozhukkatta!

Tuesday, January 23, 2024

Learn how to make a traditional Kerala Kinnathappam recipe that comes in two colors - white and black

 Both steamed plate cake and kinnathappam refer to the same delicious South Indian dessert! So, whichever term you use, you're in for a treat. There are two variants of Kinnathappam. One is white and another is black and long, but the white variant is easier to cook and is very soft compared to the black variant.

 Kinnathappam, which translates to "plate cake" in Malayalam, is a traditional Kerala dish made from steamed rice flour, coconut milk, and sugar. It's known for its soft, fluffy texture, slightly sweet and coconutty flavor, and melt-in-your-mouth goodness.

 Here's what you can expect from this delightful dessert:

 Appearance: Kinnathappam typically has a white or light brown color, depending on the type of rice used. It has a smooth, slightly cracked surface and is often cut into squares or diamond shapes. 

Kinnathappam is a traditional Kerala dish made from steamed rice flour, coconut milk, and sugar. It is a soft, fluffy cake with a slightly sweet and coconut-like flavor. Kinnathappam is typically served with stew or curry, but it can also be eaten on its own. 

Ingredients:

  • 1 cup raw rice
  • 1 cup thick coconut milk
  • 1/2 cup sugar (to prepare black color appam add 1 cup Jaggery)
  • 1/2 teaspoon cardamom powder
  • 1/4 teaspoon salt
  • 1/4 teaspoon Jeera

Instructions: 

Wash the rice thoroughly and soak it in water for at least 3 hours. 

Drain the rice and grind it to a fine powder in a blender. 

Add the coconut milk, sugar, cardamom powder, and salt to the rice flour and mix well.

Add coconut milk, sugar, cardamom powder, and salt 

Adjust the consistency of the batter by adding more or less coconut milk. The batter should be thick enough to pour but thin enough to spread easily. 

Adjust the consistency of the batter 

Grease a steamer pot with oil. Pour the batter into the steamer pot and steam for 15-20 minutes, or until the kinnathappam is cooked through. Let the kinnathappam cool slightly before cutting it into squares or diamonds. 

Tips: 

For a richer flavor, use fresh coconut milk.

If you don't have a steamer, you can cook the kinathappam in a pressure cooker.

Kinnathappam can be stored in the refrigerator for up to 2 days.

Enjoy!

Sunday, January 14, 2024

Google's Secret: The Easiest Malabar Chicken Dum Biryani Recipe (Millions Can't Be Wrong!)

 Malabar Dham biriyani is a popular dish from the Malabar region of Kerala. It is made with basmati rice, chicken, and a variety of spices. The chicken is marinated in yogurt and spices and then cooked in a pressure cooker. The rice is cooked separately and then layered with the chicken and spices. The biryani is then cooked in a sealed pot over low heat for several hours. This process called dum, helps to infuse the flavors of the spices into the rice and chicken.

 Tips: For a richer flavor, use whole spices instead of ground spices.

If you don't have a pressure cooker, you can cook the chicken in a large pot over medium heat for about 30 minutes, or until cooked through. If you don't have a heavy lid, you can use two layers of foil.

Ingredients:

  • 1 kg basmati rice
  • 1 whole chicken, cut into pieces
  • 4 tablespoons biryani masala paste (green chili, cinnamon, cloves, fennel, cardamom, peppercorn)
  • 10 green chilies, chopped
  • 2 tablespoons ginger-garlic paste
  • 50 grams coriander leaves, chopped
  • 25 grams mint leaves, chopped
  • 150 ml curd (yogurt)
  • 150 grams tomato, chopped
  • 1 kg onion, thinly sliced
  • 1 teaspoon black cumin seeds
  • 2 cinnamon sticks
  • 2 bay leaves
  • 50 grams cashew nuts and raisins
  • 5 green cardamoms
  • 200 grams ghee
  • 2 tablespoons coriander powder
  • 500 ml milk
  • 1 pinch saffron
  • 1 liter water (for rice)

Instructions:

Marinate the chicken: Wash and pat dry the chicken pieces. In a bowl, combine the chicken with biryani masala paste, green chilies, ginger-garlic paste, curd, and salt. Mix well and marinate for at least 30 minutes, or overnight for deeper flavor.

Prepare the rice: Soak the basmati rice in water for 10 minutes. Drain and set aside.

Cook the onions: Heat ghee in a large pot or Dutch oven over medium heat. Add the sliced onions and cook until golden brown and caramelized about 15-20 minutes. 

Make the gravy: Add the chopped tomatoes, black cumin seeds, cinnamon sticks, bay leaves, and cook for another 5 minutes until the tomatoes soften. 

Add the chicken: Stir in the marinated chicken pieces and cook until browned on all sides.

Deglaze the pan: Pour in some water to scrape up any browned bits from the bottom of the pot. Add coriander powder and milk, bring to a boil, then reduce heat and simmer for 20-25 minutes, or until the chicken is cooked through and the gravy thickens.

Cook the rice: In a separate pot, heat ghee and add spices like cardamom, cloves, and bay leaves. Fry for a few seconds until fragrant. Add the soaked rice, mint leaves, coriander leaves, cashew nuts, raisins, and salt. Pour in enough water to cover the rice by about an inch. Bring to a boil, then reduce heat, cover the pot tightly, and simmer for 15-20 minutes, or until the rice is cooked and fluffy. 

Assemble the biryani: Spread half of the cooked rice in a large serving dish or pot. Top with the cooked chicken and gravy. Layer the remaining rice on top and gently spread to create an even layer. 

Add saffron and finishing touches: Make small holes in the rice with a spoon and pour in saffron milk. Sprinkle with fried onions, cashew nuts, and raisins. Cover the pot tightly with foil and a lid. 

Dum cooking: Place the pot over low heat and cook for 15-20 minutes, allowing the flavors to meld and the rice to absorb the aromas.

Serve hot: Let the biryani rest for 10 minutes before serving. Garnish with fresh coriander leaves and enjoy with raita or chutney.

Tips:

  • For a richer flavor, use bone-in chicken pieces instead of boneless.
  • Adjust the amount of green chilies according to your spice preference.
  • You can substitute vegetable oil for ghee if desired.
  • If you don't have saffron, you can skip it, but it adds a beautiful color and aroma to the dish.
  • For an even more intense flavor, marinate the rice in the leftover saffron milk for 30 minutes before cooking.

Malabar Chicken Biryani is a true feast for the senses. With its layers of fragrant rice, tender chicken, and aromatic spices, it's sure to impress even the most discerning palates. So give this recipe a try and experience the magic of Malabar cuisine! 

Saturday, January 13, 2024

Old Tasty Traditional Kerala Neyyappam Recipe for Your Kitchen

 Neyyappam is a popular Kerala snack made with rice flour, jaggery, and spices. It is a sweet and fluffy dish that is often served with tea or coffee.

 Ingredients: 
1 cup raw rice

1 cup jaggery

1/4 cup water

1/4 cup wheat flour( if you prefer)

1/2 teaspoon sesame seeds

1/4 teaspoon cumin seeds

1/4 teaspoon salt

1/4 teaspoon baking soda

Coconut oil or ghee for frying

Instructions: 

Rinse the rice in water a couple of times. Soak the rice in enough water for 4 to 5 hours.

Drain all the water and add the soaked rice in a blender jar.

Add the jaggery, water, wheat flour, sesame seeds, cumin seeds, and salt. Grind everything to a smooth batter.

Add the baking soda and mix again.

Cover the batter and let it rest for 30 minutes to 1 hour.

Heat some coconut oil or ghee in a pan.

Drop spoonfuls of the batter into the hot oil.

Fry the Neyyappam on medium heat until golden brown on both sides.

Remove the Neyyappam from the pan and drain the excess oil on paper towels.

Serve hot or cold.

Tips: 

Use ripe jaggery for the best flavor and texture.

Adjust the amount of jaggery to your liking.

You can add other spices to the batter, such as cardamom or cinnamon.

For a crispy exterior, fry the Neyyappam in a hot pan until golden brown.

Enjoy! 

Here are some additional tips for making perfect Neyyappam: 

  • Use good quality rice flour.
  • Soak the rice for at least 4 hours, or overnight.
  • Grind the batter to a smooth consistency.
  • Let the batter rest for at least 30 minutes before frying.
  • Use a hot pan to fry the Neyyappam.
  • Fry the Neyyappam on medium heat until golden brown on both sides.

With a little practice, you'll be making delicious Neyyappam in no time!

Saturday, January 06, 2024

Here's the recipe for Unniyappam, a popular and delicious Kerala traditional dish for your kitchen

  Unniyappam is a traditional Kerala sweet dish made with rice flour, bananas, jaggery, and spices. It is a popular item served as a snack or dessert. Unniyappam is made by first soaking rice flour in water for 3-4 hours. The soaked rice flour is then ground with bananas, jaggery, and spices to form a thick batter. The batter is then allowed to ferment for 30 minutes to 1 hour

 Unniyappam making process

 Ingredients:

  1. 1 cup rice flour
  2. 2 medium bananas (about 175 grams)
  3. 1/2 cup jaggery powder
  4. 1 teaspoon black sesame seeds
  5. 1/4 teaspoon baking soda
  6. 1/2 teaspoon cumin powder
  7. 1/2 teaspoon dry ginger powder
  8. 1/4 cup coconut oil or ghee, for frying

Instructions: 

Rinse the rice flour in water a couple of times. Then soak the rice flour in enough water for 3-4 hours.

Drain all the water and add the soaked rice flour to a blender.

Add the bananas, jaggery powder, sesame seeds, baking soda, cumin powder, and dry ginger powder.

  • Blend until smooth.
  • Pour the batter into a bowl and cover it with a lid. Let the batter ferment for 30 minutes to 1 hour.
  • Heat a frying pan over medium heat. Add a small amount of coconut oil or ghee to the pan.
  • Using a spoon, scoop a small amount of batter and drop it into the hot oil.
  • Fry the unniyappams on both sides until golden brown.
  • Remove the unniyappams from the pan and drain them on a paper towel.
  • Serve hot or warm.

Tips:

For a sweeter unniyappam, add more jaggery powder.

For a spicier unniyappam, add more cumin powder and dry ginger powder.

You can also add other ingredients to the batter, such as chopped nuts or raisins.

Unniyappam is a delicious and easy-to-make sweet dish that is perfect for any occasion.

The origin of unniyappam, a traditional Kerala sweet dish made with rice flour, bananas, jaggery, and spices, is not well-known. However, it is believed to have a long and rich history that dates back centuries.

 The name "unniyappam" is derived from the Malayalam words "unni," meaning "small," and "appam," meaning "rice cake." This name is quite fitting, as unniyappam are small, round fritters made from a batter predominantly consisting of rice.

 Unniyappam is believed to have originated in the state of Kerala, India. They are a popular snack or dessert in Kerala and are often served with tea or coffee. Unniyappam is also offered as prasad in some temples in Kerala.

 The exact date of unniyappam's creation is unknown, but the dish has likely changed over time as a part of Kerala's culinary traditions. Unniyappam are believed to have been associated with Hindu temples in Kerala for centuries. They are often made as a sacred offering during rites in Kerala Hindu temples.

Friday, January 05, 2024

The Rasakalan Recipe a delicious and nutritious dish that is served at the Guruvayoor Temple Uttupura

 Rasakalan, also known as Guruvayur Temple Morukari, is a delightful yogurt-based vegetable curry from Kerala, often served as prasadam in temples. It's a unique and flavorful dish characterized by its creamy texture and subtle tanginess. Here's how to make it at home:

 Ingredients: For Grinding: 


  • 1/2 cup thick curd
  • 1/8 tsp rice
  • 1/2 tsp fenugreek seeds
  • 1/4 tsp black pepper
  • 4 dried red chilies
  • 1 green chili
  • 1/4 tsp cumin seeds
  • 75 grams grated coconut
  • 1/4 tsp coconut oil

For the Curry: 

  • 1/2 cup thin tamarind water (soak 1 tbsp tamarind in water, extract pulp)
  • 1/2 tsp turmeric powder
  • Salt to taste
  • 1 cup pumpkin, diced
  • 1/2 cup water
  • 1 small knob jaggery (optional)
  • Curry leaves
  • Coconut oil for tempering

Instructions: 

Grind the masala: Heat coconut oil in a small pan. Roast rice, fenugreek seeds, pepper, red chilies, cumin seeds until golden brown. Add coconut and dry roast for a minute. Cool, then grind with curd and green chili into a smooth paste. 

Cook the pumpkin: In a pot, bring tamarind water, turmeric, and salt to a boil. Add pumpkin and cook for 10 minutes, or until tender. 

Assemble the curry: Add the ground masala, water, and jaggery (if using) to the cooked pumpkin. Stir well and simmer for 4 minutes. 

Temper: Heat coconut oil in a small pan. Add curry leaves and mustard seeds. Let them crackle, then pour the tempering over the curry. 

Serve hot: Enjoy Rasakalan with rice or dosa, savoring its unique tangy yogurt blend, fragrant spices, and tender vegetables. 

Tips: 

  • You can adjust the spice level by adding more or less chilies.
  • Substitute chopped spinach or potato for pumpkin, if desired.
  • For a richer flavor, toast the coconut before grinding.
  • Serve with papad and pickles for a complete meal.

Enjoy this delicious temple-style Rasakalan recipe and bring a touch of Kerala's culinary heritage to your table!

The calorie content of Rasakalan will vary depending on the ingredients used and the amount of oil or ghee used to cook it. However, a typical serving of Rasakalan will contain approximately:

  • Calories: 400-500
  • Protein: 20-30 grams
  • Carbohydrates: 40-50 grams
  • Fiber: 10-15 grams

 Additional Notes:

 This recipe yields about 2-3 servings.

Feel free to adjust the quantities of ingredients according to your preference and desired consistency.

Most of these ingredients are found in Indian grocery stores or online retailers.

I hope this helps! Let me know if you have any other questions.

Wednesday, January 03, 2024

Favorite Traditional Morukari Thrissur style- A Delicious Kerala Cuisine

 Morukari Thrissur style! Now you're looking for a delicious Kerala staple with a unique Thrissur twist. Here's what you need to know:

What is morukari?

Morukari, also known as moru curry or pulissery, is a yogurt-based curry popular in Kerala. It's typically light, tangy, and refreshing, perfect for a hot summer day.

What makes Thrissur style morukari special?

Thrissur adds its own touch to this dish by:

Using coconut: Unlike some other regions, Thrissur morukari often features grated coconut added during tempering or ground into a paste along with spices. This gives it a rich, nutty flavor.

Spices: While the specific spice mix can vary, common ingredients include fenugreek, mustard seeds, cumin, chilies, turmeric, and ginger. This adds a layer of warmth and heat.

Vegetables: While morukari can be made plain, Thrissur often incorporates vegetables like carrots, pumpkin, green beans, or even pineapple for a touch of sweetness.

Thicker consistency: Compared to some other styles, Thrissur morukari tends to be slightly thicker and creamier, almost like a stew.

How to make Thrissur style morukari:

There are countless variations, but here's a basic recipe:

Ingredients:

  1. 2 cups thick plain yogurt
  2. 1 cup water
  3. 1 tbsp coconut oil
  4. 1 tsp mustard seeds
  5. 1/2 tsp fenugreek seeds
  6. 1/2 tsp cumin seeds
  7. 1-2 dried red chilies
  8. 10-12 curry leaves
  9. 1 inch ginger, grated
  10. 2-3 cloves garlic, minced
  11. 1/2 tsp turmeric powder
  12. 1/4 cup grated coconut (optional)
  13. Salt to taste
  14. Vegetables of your choice (optional)

Instructions:

Whisk together yogurt and water.

Heat coconut oil in a pan. Add mustard seeds, fenugreek seeds, cumin seeds, and chilies. Once they splutter, add curry leaves, ginger, and garlic. Saute for a minute.

Add turmeric powder and coconut (if using). Saute for another minute.

Pour in the yogurt mixture and stir well.

Add salt and vegetables (if using).

Cook on low heat, stirring occasionally, until the curry thickens slightly and vegetables are cooked through.

Serve hot with rice, appam, or dosa.

Tips:

  • You can adjust the thickness of the curry by adding more or less water.
  • For a richer flavor, roast the spices before adding them to the pan.
  • You can use buttermilk instead of yogurt for a slightly tangier taste.
  • Don't let the curry boil, as it can curdle the yogurt.

Whether you're a seasoned morukari fan or just looking for a new Kerala dish to try, Thrissur style morukari is definitely worth exploring. Its unique blend of creamy yogurt, fragrant spices, and fresh vegetables will tantalize your taste buds and leave you wanting more.

Thursday, September 28, 2023

Kerala-style foods good for controlling blood sugar

 Kerala cuisine is known for its use of fresh, flavorful ingredients and spices. However, it is important to note that some Kerala dishes can be high in sugar, especially those that use coconut milk or jaggery (unrefined cane sugar).

 Here are some Kerala-style foods that are good for controlling blood sugar: 

Breakfast: 

Oats upma: This savory porridge is made with oats, vegetables, and spices. It is a good source of fiber and complex carbohydrates, which can help to regulate blood sugar levels.

Ragi dosa: This type of dosa is made with ragi flour, which is a low-glycemic index food. This means that it does not cause a rapid spike in blood sugar levels.

Brown rice idli: Idli is a steamed cake made from fermented rice and lentil batter. Brown rice is a healthier option than white rice because it is a whole grain and contains more fiber.

Lunch and dinner:

 Fish curry with brown rice: Fish is a good source of protein and omega-3 fatty acids, which are beneficial for people with diabetes. Brown rice is a healthier option than white rice because it is a whole grain and contains more fiber.

Vegetable stew with chapatis: Vegetable stew is a good way to get a variety of nutrients, including vitamins, minerals, and fiber. Chapatis made with whole-wheat flour are a healthier option than white bread.

Lentil soup with brown rice: Lentil soup is a good source of protein and fiber. Brown rice is a healthier option than white rice because it is a whole grain and contains more fiber.

Snacks:

 Nuts: Nuts are a good source of protein, fiber, and healthy fats. They can help to keep you feeling full and satisfied between meals.

Fruits: Fruits are a good source of vitamins, minerals, and fiber. They can also help to satisfy your sweet tooth without causing a rapid spike in blood sugar levels.

It is important to note that even healthy foods can contain sugar. Therefore, it is important to read food labels carefully and be mindful of the portion sizes you eat.

 Here are some additional tips for controlling blood sugar with Kerala-style food:

  •  Use fresh, whole ingredients whenever possible.
  • Limit your intake of processed foods and sugary drinks.
  • Choose healthy cooking methods, such as grilling, baking, and steaming.
  • Eat smaller, more frequent meals throughout the day.
  • Include a variety of foods from all food groups in your diet.

If you have diabetes or prediabetes, it is important to talk to your doctor or a registered dietitian about creating a meal plan that is right for you.

 Ragi Dosa recipe

Ingredients

  •  1 cup ragi flour
  • 1 cup rice flour
  • 1/2 cup curd
  • 1/2 teaspoon salt
  • Water, as needed

Instructions

 Rinse the ragi flour and rice flour in a colander until the water runs clear.

In a large bowl, combine the ragi flour, rice flour, curd, and salt.

Add water, a little at a time, stirring constantly until the batter reaches a pouring consistency. The batter should be thin enough to spread easily on a hot griddle, but thick enough to hold its shape.

Cover the batter and let it rest for at least 30 minutes, or up to overnight.

Heat a griddle or skillet over medium heat.

Pour a ladleful of batter onto the hot griddle and spread it out into a thin circle.

Cook the dosa for about 2-3 minutes per side, or until golden brown and crispy.

Serve hot with your favorite chutney or sambar.

Tips

 For a more flavorful dosa, add some chopped onion, ginger, or green chilies to the batter.

If the batter is too thick, add a little more water until it reaches the desired consistency.

If the dosa is sticking to the griddle, add a little oil or butter to the pan.

Variations

 Moong dal ragi dosa: Add 1/2 cup moong dal to the batter. Soak the dal for 30 minutes before grinding it into a fine paste.

Sambar ragi dosa: Add 1/2 cup cooked sambar to the batter.

Pesarattu: This is a type of ragi dosa that is made with a fermented batter. To make a fermented batter, soak the ragi flour and rice flour in water for 8 hours. Drain the water and grind the ragi flour and rice flour into a fine paste. Add water, a little at a time, stirring constantly until the batter reaches a pouring consistency. Cover the batter and let it ferment in a warm place for 6-8 hours, or until it has doubled in size.

Nutritional information

  1.  One serving of ragi dosa (approximately 1/2 cup) provides the following nutrients:
  2.  Calories: 120
  3. Fat: 2 grams
  4. Carbohydrates: 22 grams
  5. Protein: 4 grams
  6. Fiber: 2 grams

Ragi dosa is a healthy and nutritious option for breakfast or a snack. It is a good source of fiber, which can help to regulate digestion and keep you feeling full. Ragi dosa is also a good source of protein, which is important for building and repairing muscle tissue.

Sunday, June 08, 2014

Three days of fasting can renew your entire immune system

A person’s entire immune system can be rejuvenated by fasting for as little as three days as it triggers the body to start producing new white blood cells, a study suggests
Fasting for as little as three days can regenerate the entire immune system, even in the elderly, scientists have found in a breakthrough described as “remarkable”.

Although fasting diets have been criticised by nutritionists for being unhealthy, new research suggests starving the body kick-starts stem cells into producing new white blood cells, which fight off infection.

Scientists at the University of Southern California say the discovery could be particularly beneficial for people suffering from damaged immune systems, such as cancer patients on chemotherapy.

It could also help the elderly whose immune system becomes less effective as they age, making it harder for them to fight off even common diseases.

The researchers say fasting “flips a regenerative switch” which prompts stem cells to create brand new white blood cells, essentially regenerating the entire immune system.

“It gives the ‘OK’ for stem cells to go ahead and begin proliferating and rebuild the entire system,” said Prof Valter Longo, Professor of Gerontology and the Biological Sciences at the University of California.

“And the good news is that the body got rid of the parts of the system that might be damaged or old, the inefficient parts, during the fasting.

“Now, if you start with a system heavily damaged by chemotherapy or ageing, fasting cycles can generate, literally, a new immune system.”

Prolonged fasting forces the body to use stores of glucose and fat but also breaks down a significant portion of white blood cells.

During each cycle of fasting, this depletion of white blood cells induces changes that trigger stem cell-based regeneration of new immune system cells.

In trials humans were asked to regularly fast for between two and four days over a six-month period.

Scientists found that prolonged fasting also reduced the enzyme PKA, which is linked to ageing and a hormone which increases cancer risk and tumour growth.

“We could not predict that prolonged fasting would have such a remarkable effect in promoting stem cell-based regeneration of the hematopoietic system,” added Prof Longo.

“When you starve, the system tries to save energy, and one of the things it can do to save energy is to recycle a lot of the immune cells that are not needed, especially those that may be damaged,” Dr Longo said.

“What we started noticing in both our human work and animal work is that the white blood cell count goes down with prolonged fasting. Then when you re-feed, the blood cells come back. So we started thinking, well, where does it come from?”

Fasting for 72 hours also protected cancer patients against the toxic impact of chemotherapy.

“While chemotherapy saves lives, it causes significant collateral damage to the immune system. The results of this study suggest that fasting may mitigate some of the harmful effects of chemotherapy,” said co-author Tanya Dorff, assistant professor of clinical medicine at the USC Norris Comprehensive Cancer Center and Hospital.

“More clinical studies are needed, and any such dietary intervention should be undertaken only under the guidance of a physician.”

“We are investigating the possibility that these effects are applicable to many different systems and organs, not just the immune system,” added Prof Longo.

However, some British experts were sceptical of the research.

Dr Graham Rook, emeritus professor of immunology at University College London, said the study sounded “improbable”.

Chris Mason, Professor of Regenerative Medicine at UCL, said: “There is some interesting data here. It sees that fasting reduces the number and size of cells and then re-feeding at 72 hours saw a rebound.

“That could be potentially useful because that is not such a long time that it would be terribly harmful to someone with cancer.

“But I think the most sensible way forward would be to synthesise this effect with drugs. I am not sure fasting is the best idea. People are better eating on a regular basis.”

Dr Longo added: “There is no evidence at all that fasting would be dangerous while there is strong evidence that it is beneficial.

“I have received emails from hundreds of cancer patients who have combined chemo with fasting, many with the assistance of the oncologists.

“Thus far the great majority have reported doing very well and only a few have reported some side effects including fainting and a temporary increase in liver markers. Clearly we need to finish the clinical trials, but it looks very promising.”

Monday, December 10, 2012

LEMON - 10,000 times stronger than Chemotherapy

Well - what a remedy for the disease unbelievable - There is no harm just drinking this water as a normal water, day to day.?   Please pass this on to your family and friends
 hello!!!  just want to share this good information

Just cut 2-3 thin slices of lemon in a cup/container and add drinking water so that it will become "alkaline water", drink it for the whole day, just by adding drinking water further more.Take it as drinking water everyday is good for everybody.

The surprising benefits of lemon! I remain perplexed!
 This is the latest in medicine, effective for cancer!
Read carefully & you be the judge

Lemon (Citrus ) is a miraculous product to kill cancer cells .   It is 10,000 times stronger than chemotherapy     Why do we not know about that? Because there are laboratories interested in making a synthetic version that will bring them huge profits.
You can now help a friend in need by letting him/her know that lemon juice is beneficial in preventing the disease. 

Its taste is pleasant and it does not produce the horrific effects of chemotherapy.

  How many people will die while this closely guarded secret is kept, so as not to jeopardize the beneficial multimillionaires large corporations?   As you know, the lemon tree is known for its varieties of lemons and limes. 

You can eat the fruit in different ways: you can eat the pulp, juice press, prepare drinks, sorbets, pastries, etc...

It is credited with many virtues, but the most interesting is the effect it produces on cysts and tumor.   This plant is a proven remedy against cancers of all types.

  Some say it is very useful in all variants of cancer . It is considered also as an anti microbial spectrum against bacterial infections and fungi, effective against internal parasites and worms, it regulates blood pressure which is too high and an antidepressant, combats stress and nervous disorders. 

The source of this information is fascinating: it comes from one of the largest drug manufacturers in the world, says that after more than 20 laboratory tests since 1970, the extracts revealed that : It destroys the malignant cells in 12 cancers
including colon, breast, prostate, lung and pancreas   The compounds of this tree showed 10,000 times better than the product Adriamycin, a drug normally used chemotherapeutic in the world, slowing the growth of cancer cells.

And what is even more astonishing:   this type of therapy with lemon extract only destroys malignant cancer cells and it does not affect healthy cells.

Institute  of  Health  Sciences,  
819 N. L.L.C. Cause Street ,  
Baltimore , MD1201